.svg?alt=media&token=55c21d93-46b6-42c2-b33b-1520abf6a27c)
Setting up metamask
Last updated
Last updated
Set Up a Cryptocurrency Wallet We highly recommend utilizing the Metamask wallet due to its user-friendly interface and widespread adoption. To get started, kindly follow the provided link to install the Metamask extension on your preferred web browser. Once installed, click on the Metamask icon to launch the application. Proceed by creating a new account, ensuring that you securely save your 12-word seed phrase. Exercise utmost caution and refrain from sharing this phrase with anyone, as it grants complete control over your wallet.
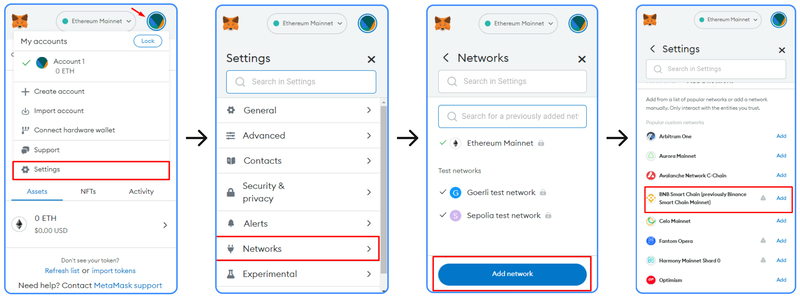
Transition to the Binance Smart Chain Prior to proceeding further, it is essential to switch your wallet's network to the Binance Smart Chain.
Enable token autodetection
Navigate to Settings -> Security&Privacy -> Autodetect tokens and set this option to "ON"
Add funds to your Metamask wallet
You can use Metamask "Buy" button to purchase BNB directly from Metamask exchange
You also can use your favourite exchange (i.e. Binance) to transfer some BNB directly to your Metamask. To do this, copy your Metamask address by clicking it at the top of Metamask main screen and transfer BNB from Binance to this address. Make sure to choose the right Network: Binance Smart Chain (also known as BSC or BEP20)
When your BNB appears in the Metamask "Assets" list, swap it to $USDT. Important: do not swap all the BNB you have, you need to leave ~0.01 BNB to pay the gas fees later, otherwise you won't be able to sign transactions!
Eventually you should see both currencies, BNB and USDT, in your "Assets" list
After making your first deposit, you automatically become an elite user.